Showing posts with label Yeast Breads. Show all posts

12 September 2015

Holy smokies. Has it really been 10 years?

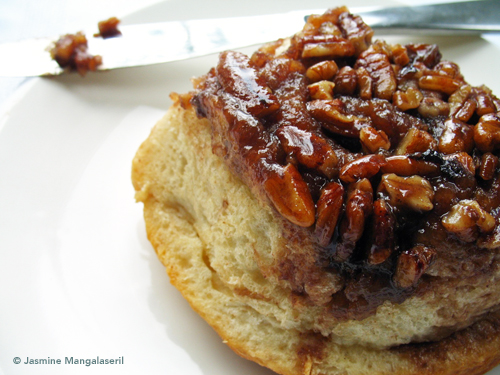
150908 Edna Staebler Sticky Buns 4


Has a decade passed since I started writing this blog?

I guess it has.

I'll set some thoughts to pixels about the past 10 years, but not today. Yes, I've got something up my flour-dusted and sauce-splattered sleeve--but I need to get a wiggle on to get it sorted.

The past week has been filled with happy things: apart from Cardamom Addict's anniversary, I've also marked my birthday (really, every year is a significant year) and celebrated as my dear friend exchanged "I dos" with his beloved. It's always a special thing when two people who are totally and utterly in love make a commitment to one another. They are both kind and giving souls and I wish them all the happiness in the world.

For three days we fested in a bucolic setting, complete with bright blue skies, a babbling waterfall, green fields, shady trees, storybook black and white Bessies keeping the grass at bay, and a horse who occasionally marked his glee by waggling on his back in his paddock.

As with many such events, not everyone who should attend, can attend. Tucked into a display of photographs of family who have passed away, but not passed in memory, was a photograph of a familiar face with twinkly eyes. You see, my friend who was getting married, was the same person who introduced me to our dear Edna Staebler. While he was not born into Edna's family, he became one of hers.

Edna was a local treasure, literary trailblazer and the woman who introduced the world to the Mennonite cookery of our area, Waterloo County. Regular readers know I've written about her before. In fact, today is the ninth anniversary of Edna's passing.

In honour of Edna, and what she meant to my friend, her recipes were curated by Rose Murray into the weekend's menus: Good As Gold Soup; Ol’ Walper Hotel’s Spinat Salad coquette on German Red Cabbage with Apples & Bacon; Herb & Peppercorn Sirloin with Red Wine Demiglace; Roast Pork with German Mustard, Pepper & Rosemary, with an Apple-Cranberry-Sweet Onion Chutney, Mixed Veg; Loaded Mashed Potatoes, and (of course) the sweets--pies, cookies, butter tarts, and sticky buns.

I could not think of a more perfect edible collection for this celebration.

While I hemmed and hawed about my tenth anniversary post and what would busy my kitchen, I took inspiration from these celebrations and decided to make Edna's sticky buns from her second cookery book, More Food That Really Schmecks.  

And really, how better to recognize Cardamom Addict's milestone than by recognizing a lovely and amazing local home cook--one without airs or pretension--who loved to write?

Edna's sticky buns are made from "Mary Ann Martin's Magic Buns, Doughnuts, and Rolls."  We all need a mother recipe that's easily adaptable--and this one is.  Apart from sticky buns, instructions are given for cream buns, Chelsea buns, long johns, and honey-glazed doughnuts.

The original mother recipe calls for more than 1kg of flour. To make the sticky buns, we are instructed, as any good home baker would, to follow as you would for the Chelsea buns, but use maple syrup and cream instead of butter, sugar and raisins at the bottom of the pan. How much dough to use for the Chelsea buns (and hence the sticky buns)? A piece, of course.
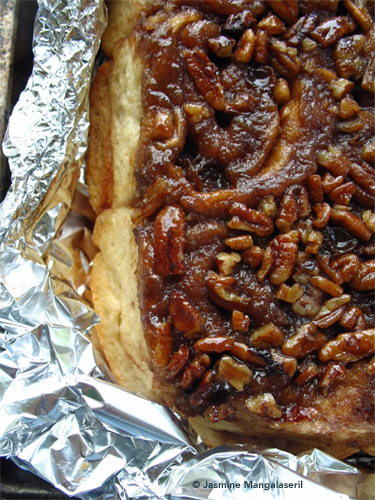


Edna Staebler Sticky Buns 3


Maple Pecan Sticky Buns 

Adapted from Edna Staebler's recipe in More Food That Really Schmecks 

Yield: One 23x30cm (9"x12") pan


Ingredients:

For the dough
0.25tsp/1.25ml sugar
3Tbsp+1tsp/50ml hand-hot water
1dspn/10ml/7g yeast 1c/250ml water
0.25c/60ml/50g sugar
3Tbps/45ml/40g lard (see notes)
0.25tsp/1.25ml salt
1 beaten egg
3-4c/750ml-1L/450-600g all purpose flour, as needed

For the syrup (see notes)
Maple syrup
Cream or butter
Pecans salt

For the filling (see notes)
Melted butter
Brown sugar
Plumped sultanas

More melted butter


Method:

Start with the dough by blooming the yeast in 50ml hand-hot water, mixed with a quarter-teaspoon sugar. A frothy head should appear after 10 minutes.

While the yeast is frothing, turn on the hob to melt the lard, sugar and salt in the water--even using frozen lard, it doesn't take more than five minutes. Cool the water to not much above a lukewarm temperature.  Temper the egg with this sugar-water solution, mixing well before adding the egg to the pot. Whisk in the yeast.

Create a soft--if slightly sticky--dough by mixing in several heaping spoonfuls of flour at a time--the amount of flour you'll need will be dependent upon your kitchen's mood. When the dough is of a good consistency, give it a light knead before plopping it into an oiled bowl. Set the bowl in a warm, draft-free space until the dough doubles in volume (about one hour).

While the dough is rising, butter the baking dish.

Make the syrup by melting the butter into the maple syrup. Give it a good stir and pour into the bottom of the prepared baking dish. Tilt the dish so the bottom is fully coated with the buttery maple syrup. Strew nuts on top and give it a light sprinkling of salt.

When the dough is ready, punch it down and roll it out to about a 1.25cm (0.5") thick rectangle. Slather generously with the melted butter and sprinkle with a few handfuls (or more, or less), of brown sugar. Lightly dust with cinnamon. Strew sultanas before tightly rolling the sheet as you would a jelly roll. Pinch the edge to the log to form a seam.

Cut the log into even 3cm-4cm (1"-1.5") stumps and place cut-side down into the prepared pan. Brush the exposed bottoms with any remaining melted butter (or melt some more), cover the dish with cling film and prove the buns until they double in volume (again, about an hour).

Preheat oven to 190C/375F and bake, uncovered, for about 20-25 minutes or until your kitchen is scented with baking and the buns are golden. Remove from the oven and immediately place large baking sheet over the baking dish. Grasp the blisteringly hot dish and baking sheet together (using oven mitts, of course) and turn the buns over, releasing buns and topping onto sheet, so that the nuts and and sticky sauce are now on top.

Let cool five minutes before serving. Serve warm.


Notes:

If you don't use lard, use the same quantity of shortening--the original recipe called for either fat. 

Re: Syrup:
Edna's recipe calls for maple syrup and cream (without quantities). Here's what I did (give or take)--you may want more or less for your buns:
  • A scant 0.5c maple syrup 
  • 2Tbsp butter 
  • Several Jasmine-sized handfuls of pecans (in other words, use your judgement) 

Re: Filling:
Again, Edna doesn't provide quantities, because you really don't need them. I didn't measure, so these are approximations. Again (again), you may want more or less for your buns:
  • 2-3Tbsp butter, (melted)
  • 1 generous cup of dark brown sugar (enough to opaquely cover the sheet) 
  • 1tsp cinnamon -- Perhaps less. Perhaps more. 
  • 0.5c dried sultanas, revived in hot water and drained 
  • I also used a light sprinkling of both black pepper and hot chilli pepper in the filling--I like it, and I think Edna wouldn't mind.

cheers!
jasmine
I'm a quill for hire!

15 November 2013

Daring Bakers, Tribute To Lis: Hot Buttered Soft Pretzels

La Mia Cucina's Lis Cifelli, Daring Bakers and Daring Kitchen co-founder died  of a heart attack earlier this week.  She was 46.

Many things flicked through my mind when my BlackBerry binged about a dozen times over the course of a few minutes.  That only happens when something's very wrong…but when I saw a distribution list of a couple dozen foodbloggers, including old-school names, my heart stopped.  We lost one of our own.

Later that  evening a few of us who were part of foodblogging's salad days were in a twitter chat about those old days, especially the Daring Bakers' early days.

The Daring Bakers started off in 2006 as two online friends--Lis and Ivonne of Cream Puffs in Venice--daring one another to try the same recipe and post their results.  It looked like fun and fit in well with foodblogging's early days which were marked by fun, encouragement and a prevailing feeling of "we're all in it together."  Many of my foodblogging friends were in the first groups and I was christened a DB within seven months of the Lis and Ivonne's inaugural challenge.

As the group grew, so did our collective skill, knowledge and well as our individual friendships.  Apart from encouraging me to bake my first macarons and try my hand at pasta making, I also found my go-to cheesecake recipe and made some good friends.  In 2009 I even hosted a the Bakewell Tart challenge--ably assisted by my dear Annemarie of Ambrosia and Nectar.

Time and energy are limited, and I (like several early members) simply faded out of the challenges so we could concentrate on what we wanted our lives and blogs to become  and left the DBs to the next generation who continue to to challenge each other with new adventures (yes, I did peek at this month's challenge recipe: it looks like an amazing one).

So when that FB chat turned to how we could memorialise Lis and all she did to contribute to foodblogging's community building, we decided to brush off our DB skills and return to a challenge recipe, prepare it and post it in her honour.  But which one to choose? If I were to do one that makes me smile every time, it would be my friend Shuna Fish Lydon's Caramel Cake

Given what Lis and Ivonne did for foodblogging, and the memories Lis' passing brought me, I thought it was appropriate to post the very first Daring Bakers' challenge: Hot Buttered Soft Pretzels.

I'll admit to not really being a pretzel-eater, simply because My Dear Little Cardamummy never kept them in the house (truthfully, she thought they were dog food and was repulsed by the idea that anyone would eat them).  But these aren't those hard, dry twigs.  These are soft, bready and buttery….and really, really easy to make.

But not so easy that I couldn't make a couple of oopsies.  Apart from missing the 15-minute rise before baking, after I pulled them out of the oven I realised I used bread flour instead of AP.  Quite honestly--the oversights weren't showstoppers and I really don't think the pretzels suffered from my inattentiveness.

The recipe called for an optional salt sprinkle, which I did, but I also decided to take a couple of liberties with some of the breaded knots and made rosemary-black pepper-Parmesan and  cinnamon-sugar toppings,  and made little sesame seed-coated twisted pretzel sticks.

Recipe: Hot Buttered Soft Pretzels
DB Challenge Recipe: Cream Puffs In Venice: Perfect Pretzels
Original Recipe:  King Arthur Flour: Hot Buttered Soft Pretzels


cheers!
jasmine

I'm a quill for hire!

28 March 2010

Estonian Lenten Buns...and bunnies and duckies and tap-dancing Barneys

When I saw our dear Pille's recipe for Vastlakuklid (Estonian Lenten Buns I knew I had to make them. Rich, tender and flavoured with cardamom, how could I not make them?

Well, that was three or four years ago.

Just before each subsequent Easter I have every hope and intention of making her perfect buns. But then...well...I forget. Yes, even though I can recall many conversations word-for-word (ask any of the men I used to go out with), at times I cannot keep a simple, seasonal foodish intention in my mind long enough to follow it through to fruition.

It was almost the same story again this year. Almost.

Long after I declared my Lenten promise a disasterous foray into self-improvement, I remembered the buns. Those lovely, cream and jam-filled buns. Well, if I can't actually get around to 100 pages of pleasure reading every day during Lent, I can get these buns done. Yeah, it was probably safest for those around me that I not give up chocolate, caffeine or anything that keeps my few shreds of sanity firmly within my possession.

Since it's Easter, I also decided to use some of the dough and revisit the
bunny-shaped bread I made a few years ago. I mean, how perfect would it be to make a Lenten bread in the shape of a cute little Easter bunny? Well...

In that last rise, my lovely little bunnies took on lives of their own and turned into...edible instances Gestalt figure-ground principle (yes, those pictures that could be interpreted in more than one way, like the old woman-young woman picture).

Except my tray produced what some people would call bunnies...while other would see...I don't know...a toucan, a little lamb with a bow, a tap-dancing Barney, a mollusc, a duckie...some sort of leaping Pokemon character.


This isn't the first time my yeasted goods have taken on some sort of figurative bent.

Based on this, I'm sure I can come up with some sort of side business as a baker-teacher-cum-therapist: I teach people how to make delicious yeasted breads and when the treats are done, analyse the buns (or doughnuts) to help them lead a happier and less neurotic life...and one filled with tasty, tasty buns.


I'm late in making these (I hope Pille will understand)--they are traditionally eaten the day before Ash Wednesday, the first day of Lent, much like pancakes are eaten here in Canada. These buns are easy to make have a light cardamom flavour. Split them open and fill them with sweetened jammy cream, jam (apricot, lingonberry or blueberry would work nicely), orange curd or even marzipan.

Vastlakuklid: Estonian lenten buns
adapted from
Pille of Nami-Nami's Vastlakuklid: Estonian lenten buns

Yield 12 buns

250ml (1c) hand-hot milk
6g (1.75tsp) dry yeast
400g (3c less 2.5Tbsp) ap flour
0.5 tsp salt
0.5 tsp ground cardamom (seeds from 4 pods)
100g (0.5c less 1Tbsp) butter, melted and cool
1 egg, lightly beaten

cream or lightly beaten egg (optional)

Dissolve the yeast into the milk. Stir in approximately half the flour until fully incorporated. Cover with cling and let double in volume in a warm, draft-free place (about an hour).

Combine salt, cardamom and the rest of the flour and add to the yeasty mixture. Add the butter and the egg and mix well. Turn out to a lightly floured surface and knead until smooth and elastic, but not tacky.

Return to proving bowl, cover and let double in size.

Preheat oven to 200C/400F; line a baking tray with parchment paper.

Punch down and divide into 12 pieces. Roll the pieces into balls, and place on lined baking tin. Let rise for about 30 minutes or until the buns have doubled in size.

Brush on cream or beaten egg and bake for 15-20 minutes or until golden. Remove from oven and cover with a teatowel while cooling.

Split the buns and fill with sweetened or flavoured cream, jam, curd or marzipan.


cheers!
jasmine


I'm a quill for hire!


AddThis Social Bookmark Button


15 January 2010

Happy birthday Edna: Cranberry-ginger swirly buns

A few years ago I, along with a number of bloggers, celebrated the life of my dear friend Edna Staebler with an event called A Day That Really Shmecks.

I wanted to continue celebrating her life, on her birthday, but life happened and continues to do so. This year I may have not resurrected the event, but I am event this year but I'm celebrating Edna today. Maybe next year I'll get my act together and ask people to join me.


One of my ways of showing others I care is to cook for them. Rarely intricate, occasionally zhuzhed, I will occasionally appear, dish in hand with something I hope is as equally heart warming as it is tummy warming.

A kitchen filled with the comfortingly warm scent of freshly made bread will make the world a better place. It's a life axiom. So when a friend was hit with a bit of shocking news earlier this week...the kind where the fug of words just suck away oxygen and thought, I wanted to do something to let her know that that she's thought of and I care. Swirly buns must be made
Edna's Neil's Harbour Bread recipe has become my jump point when making anything of this ilk. The recipe has never failed me and I find almost infinitely forgiveable. In fact the only time it begrudgingly gave me a loaf was when I accidently slashed the top of the loaf prior to baking: the texture remained gorgous, but instead of a wonderful domed crust, a flattened lid formed.
This variation used a warmed, thinned yoghurt instead of water and an improvised filling. I'm not convinced you actually need a recipe for the swirl of any swirled bun (cinnamon buns, included)--just brush with melted butter and sprinkle with as much spiced sugar as you want and then sprinkle handfuls of fruit and or nuts. And yes, you can forgo the sugar and spread chocolate, caramel or go a savoury route and use a cream cheese doctored with herbs, onions or veggies.

Cranberry-ginger swirly buns

85ml hand-hot water
1/2tsp sugar
1dspn traditional yeast
60ml yoghurt dissolved with 100ml hot (but not boiling) water
35g sugar
1tsp salt
40ml canola or some other flavourless oil
420g ap flour (plus more, if necessary)
Melted butter
3Tbsp brown sugar
2Tbsp sugar
pinch of salt
1/2-1tsp powdered ginger
a couple of handfuls of dried cranberries

Dissolve the yeast and half teaspoon of sugar in the hand-hot water. Let sit for about 10 or 15 minutes until a frothy head has formed.

Whisk in the yoghurty mixture, 35g sugar, salt and oil.

Work in the flour, about a cup at a time, mixing until you have a floppily moist, but easily handled dough. Turn out onto a well-floured surface and knead, sprinkling in as much flour as the dough needs--until smooth and elastic but still slightly sticky.

Plop the dough into a well-oiled bowl and cover with a damp teatowel, well-oiled piece of cling or waxed paper. Set to double in volume in a warm place free of drafts or other disturbances--somewhere in the 1-2 hour range.

Butter an appropriately-sized baking dish (24cm (8") square if you want nine buns; 23cm x 33cm (9" x 13") if you want a dozen).

Mix the remaining sugars, salt and ginger together.

When the dough has grown to the appropriate size, give it the poke test. By this I mean deeply poke the dough with your index and middle fingers. If the indentations stay, the dough is ready to be worked. If they fill in quickly, then the dough needs rise a bit longer.

When the dough passes, knead it again and then roll it out into a rectangle-I really don't measure, but roughly 30cm x 45cm (12" x 18"). Brush with melted butter and sprinkle with gingery-sugar mixture. Strew the cranberries, on top.

Roll it up, so you have a 45cm-long roll. Cut into the appropriate number of pieces and set into the greased pan, spaced apart to give them enough time to grow.

Return to that warm place, free of drafts and other disturbances, for about an hour, to let the buns grow.

Preheat the oven to 200C/400F. Brush the tops with melted butter and bake for 20 minutes or until golden.

When cooled, cut the individual buns. Glaze as, how and if you wish.

cheers!
jasmine

What I'm reading:
The Girl With The Dragon Tattoo by Stieg Larsson (opens to my Amazon.ca shop)

I'm a quill for hire!


AddThis Social Bookmark Button


04 October 2009

Happy Cinnamon Bun Day!

When our darling Glamah of Coco Cooks Tweeted today is Sweden's National Cinnamon Bun Day, I grabbed hold of this opportunity to coax my latent (and totally fictitious) inner Swede out and celebrate with the rest of my bun-baking brethren and my sweet-toothed sistren.

No...I didn't start playing dollies with a root veggie...nor am I part vegetable (regardless of the quality of my writing some days).

It's been a while since I've had a cinnamon bun. Why? I must admit I've gone off them. Wherever I go, coffee shops and cinnamon bun emporiums try to convince me that insipdily sugary, tar-sticky, bready turbans mortared with icing so thick, one could restore parts of Hadrian's Wall with them.

Don't get me wrong, the first time I had one of those mall kiosk cinnamon buns, I was quite enamoured. Time passed and doughnut and coffee shops, grocery stores and cafeteria versions popped up and morphed what was a happy little swirly pastry into a Frankensteinesque Type-Two Diabetes inducing meal of a snack just put a bitter taste into my mouth.

Swirls of golden dough, filled with cinnamonny-sugar and dried fruit or nuts, glazed with a brushing of butter-dampened sugar. That's the kind of cinnamon bun I prefer.

What better to celebrate Sweden's foodie feast day than to remind myself of the buns I'd happily come home to?

I've written about cinnamon buns before, but I thought a new version was called for. This one's a little more straightforward, but easily adaptable --change the almonds to the fruit or nut (or combination) of your choice. Glaze the top with any flavour or any toffee or icing.

I must admit I wasn't fully paying attention to the buns as I cut them. Sometimes counting to 12 is beyond me. Sometimes 14 is easier than 12. I quite like the effect, away from the ordered three by four order these things usually demand. Instead there's an organic movement borne of living yeast pushing the dough to fill every possible nook of the pan. Some big. Some small. Deeper golden flecked with spots of bright slivers My tray of buns is, hence, oddly reminiscent of
van Gogh's Starry Night.

It's a good version, with a slighty marzipan-ish flavour, adapted from Anita Stewart's The Flavours of Canada. Absolutely easy, yet takes much of an afternoon to make--most of that time taken up with proofing. A trifle, really, given you are returned with a house filled with bready and cinnamony scents.


Almond Cinnamon Buns
Adapted from Mrs. Peterson's Cinnamon Sticky Buns from The Flavours of Canada by Anita Stewart
(yield 12)

To bloom the yeast:
2 Tbsp hand-hot water
1/2 tsp sugar
1 dspn active dry yeast

For the dough
2 eggs, well beaten
100g sugar
110g butter, melted
pinch of salt
150ml hand-hot milk
420g ap flour
canola oil (or other flavourless oil)

For the filling
75g brown sugar
1tsp cinnamon
1dspn butter, melted
100g flaked almonds

For the glaze
2 Tbsp butter, melted
3 heaping Tbsp icing sugar
splash almond extract
2-3 Tbsp milk or cream

Bloom the yeast for 10 minutes or until a healthy, frothy head develops.

Whisk together the sugar, melted butter, salt and milk; add the eggs and bloomed yeast. Mix well. Add the flour, in thirds, beating well and scraping down the bowl between additions.
When all the flour is incorporated, lightly dust your counter with bench flour and knead for about 5-10 minutes or until the dough is elastic and as soft as a baby's bottom. Place in an oil-slathered bowl, cover and let double in size in a warm, draft-free place...about 90 minutes.

Mix the cinnamon and sugar together.

Line a 23cmx35cm (9"x14") lasagna pan with parchment paper. Butter the parchment.

Turn out the dough onto a floured surface. Knead for about five minutes and let rest. Give it the two-finger poke test*. When it passes, roll the dough into a 20cmx35cm (8"x14") rectangle.

Brush the dough with the melted butter. Sprinkle with spiced sugar and strew with almonds.

Roll up the sheet, so you have a fat, 35cm log. Cut into 12 pieces and place roughly 2.5 cm (1") apart in the prepared pan. Cover lightly and return to the warm, draft-free place until doubled in size...about one hour.

Preheat oven to 350F/180C.

Bake for about 15 minutes or until the buns are golden.

Brush the tops with melted butter, while the buns are still hot.

When the buns have cooled a little, but still warm, mix the melted butter, icing sugar and almond extract together. Add a little cream to thin it out. Drizzle over the warm buns.

* Two finger poke test: Poke the dough with your index and middle fingers to a first-knuckle depth. If the dents fill in, let the dough rest a little longer and try again. If the dents keep, you're good to go.


cheers!
jasmine


I'm a quill for hire!


AddThis Social Bookmark Button

29 October 2008

Daring Bakers: Basic Pizza Dough

OOPS! Okay...I'm late...profuse apologies. I thought this month's DB post was due on Thursday 30 Oct...not Wednesday 29 October...and technically, it still is the 29th...

Oh well...that's what happens when you're off in all directions.

As you've probably noticed, many home pizzarias magically popped up this week, thanks to the late, great Shar of What Did You Eat? and the very wonderful Rosa of Rosa Yummy Yums. They decided to challenge us to make pizza dough by hand, and in the fashion of true pizzaiolos.

I have a favourite pizza dough recipe, courtesy of (the once divine, but now demoted since her last cookbook) Delia Smith, but every once in a while go in search of another. When in those moods I whole heartedly approach the new recipe...only to quickly morph into my comfort zone.

Yes, I followed the DB recipe...okay, I halved it, and used my handy pan, but still it was followed. Much to my surprise it worked...even the special flippy pokey tossy method. It didn't fall to the floor and it didn't end up on the ceiling...okay...no worries about that, I am 5'1". Instead of making three pizzas, I decided to make two largish ones...heck...it was eDay...and well, you know what I think of eDays (and yes, I'll probably treat the US election in a similar fashion).

The dough was thinnish and tasty and held the far-too-many toppings I loaded onto it. I'll probably come back to it and play with it some more.

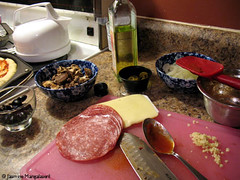
And my toppings? Well...I went for pickable--as in bits I can pick off the top as I'm transfixed to the results ticker, and then wolf down the bready bit during lulls. Salami, onions, black olives, garlic, jalepenos, cheese and tomato sauce. If I had anchovies, they'd be added as well...

From this:


To this:


And here's how:


cheers!
jasmine


AddThis Social Bookmark Button


28 June 2008

Mmm...Canada: Bacon, ramp and mushroom swirls

Earlier this month Jennifer and I issued a challenge to the foodblogging (and foodblog reading) world. We want to know what Canada tastes like to you. She's interested in all things sweet and I'm interested in the savoury side of life

In my entry for Jennifer's event, I stated that I think Canadian cuisine (savoury or sweet) developed through adapting family and cultural dishes using a mixture of indigenous and introduced foods. For that post, I made spiced blueberry-maple syrup that combined indigenous ingredients (maple syrup and wild blueberries) along with introduced flavours (cinnamon and black pepper).

For my own event, I'm keeping within that theme and expanding it a teeny bit.

In May a good friend of mine left a
box of wild bounty she collected from her properties for me. My, those were some lovely looking ramps.

My idea was quite simple: work with flavours that play well together to bring out their oniony-garlicky best. Essentially what I think of as the basic tenet of cooking (Canadian or otherwise)-- simple homey cooking that's unfettered by fashion that uses what's easily available in a tasty way that's not only soothing but also makes you glad you're home.

In researching the various rampy treats, I came across a a recipe for a savoury ramp strudel. With a few tweaks (aided by a bit of a stromboli fascination), I decided to make savoury, swirly buns, using bacon, cheese and mushrooms. It sounds like a lot of elements, but really, it isn't. Plus, it combines those ingredients in a way I think of as Canadian in substance and spirit:

  • Pigs were brought over fairly early in our history,
  • Quebec has a great cheesemaking tradition, and we do make our own versions of American and European cheese
  • Mushrooms are both harvested wild and cultivated
  • Prairie wheat was used to mill my flour
  • Herbs and spices from Europe and Asia

Again, this is a recipe that really doesn't need one. Okay...the bun part does. If you don't have a recipe you like, I made mine based on Edna Staebler's Neil's Harbour White Bread (and I used one-third the recipe).

The filling:

  • streaky bacon, chopped into bits
  • ramps (spring onions, green onions, globe onions or leeks will also do), green and white bits, chopped
  • chopped mushrooms
  • salt, pepper, thyme
  • softened cream cheese (any soft or melty cheese will do)
  • one beaten egg
  • Parmesan cheese

Make the dough. During the first rise, fry the bacon until crisp and evacuate the bits to a bowl, leaving the fat in the pan. Fry the ramps and the mushrooms in the fat--add some oil if you need to. Season with salt, pepper and thyme. Reintroduce the bacon to pan and give it all a good stir. Remove contents to a bowl and set aside.

After the dough has doubled, role it out to a 24x30 cm (8"x12") rectangle. Smear with cream cheese and spread the rampy-baconny-mushroomy topping over the cheese. Roll the sheet up, so you have a 30-ish cm log. Slice in 12 rolls and place in a baking tin. Brush with beaten egg and sprinkle with Parmesan cheese. Let rise until doubled in size.

Heat oven to 200C/400F and bake for 10-15 minutes or until done.


Check back on Canada Day (01 July 2008) to see Mmm...Canada: The Savoury Edition's round-up)


cheers!
jasmine


AddThis Social Bookmark Button


23 March 2008

Bread bunny massacre

It was one of those ideas that grabbed hold of me and wouldn't let go. It was just so...cute.

That's the only explanation for my bread bunny massacre.

Actually...no. That's not the only explanation: It is my ingrained desire to recreate whatever foodish item that's tickled my fancy, in hopes that I can then have it whenever I want.

Wait...one more reason: I felt the need to put my Fine Arts degree to good use...even if my degree was in Art History, I have years of studio work under my belt (mostly in painting, but some in sculpture).

You see, the other week I was in the SwankyFooderie and they had little flyers pinned to the cash till advertising
Ace Bakery's bread bunnies. While I was queued, balancing containers of Portuguese olives, hunks of Stilton and Roquefort and Guinness Cheddar, packets of breaded portabellos and jalapenos, sushi and a box of Maldon salt (umm...I went in for the salt, that's it), I stared at the photo of the bread bunny.

"Gosh...That is cute--and creative," thought I as the sushi tried to make a break for it. "It can't be that difficult to fold bread...it would be great at Easter."

(Yes, here's where you're allowed to go "No Duh...it is Easter time.")

I thought about the photo...and the cuteness surcharge on what really amounted to a couple of whorls of dough. It became my mental wander of choice for the ensuing days. Let's face it, when I'm super busy, my brain needs a break and meanders to a different puzzle that needs solving.

Well...I couldn't figure it out without actually seeing one. Unfortunately, they were special order breads, only available this weekend. So I broke down and ordered a couple of bunnies, which I picked up on Holy Saturday.

When I got home, I closed my blinds and out came the paring knife.


Mwah-ha-ha...I felt like one of those early anatomists, forced to learn the intricacies of form by scavenging cadavers from public hangings or insane asylums or something. After looking at them, back and front, and then carving out the nearly Möbius strip-like construction, I pretty much had it sorted...after I figured out that each bun was made of two bits of dough.

So Now that I had the form figured out, I needed to recreate it. I chose my favourite hot cross bun recipe, as previously blogged about. Except this time, omitting the fruit and just using the spiced dough--each hot cross bunny would get a raisin eye, though. It was pretty easy, even if Beelzebub gave me black-bottomed bunnies (yes, out of pure stubbornness, I re-made them).


So, for those of you who want to make bunny-shaped bread, here are my step-by-step photos. I didn't give them enough room to rise, so many of them look rather...Quasimodo-like...but the few who were given ample growing room look rather bunny-like...even if in a Picasso-esque way.

After the first rise, divide the dough into as many pieces you wish. For the Delia recipe, I divided it into 12 pieces, and snaked them out. Divide each into two pieces, with one piece roughly twice the length as the other. The longer bit will be the bunny body, the smaller will be the head and ears. Then put them onto a baking sheet and allow them to rise until doubled in size. About 30 minutes before you pop them into the oven, place a current or sultana in the head for its eye:


And the final result...isn' t he cute?


cheers!
jasmine

AddThis Social Bookmark Button


29 February 2008

Daring Bakers: Julia Child's French Bread

I think it's a rare North American home cook who can claim to be pristine against the influence of the great Julia Child. I remember watching her show, The French Chef, as PBS repeats: her distinctive sing-songy voice teaching viewers how to make sauces or crĂŞpes or beasts in a way that was very matter-of-fact, but approachable. More importantly, I thought she was having fun.

When our fabulous Daring Bakers hosts,
Sarah of i like to cook and Breadchick of The Sour Dough challenged us to make Julia Child's French Bread, I knew this would be a combination of fun and, well...work.

Yes, I'm fully aware of those glorious home bread machines that via prest-o-change-o magic fill homes with scrumptious aromas in three hours. Relatively effortless, all you have to do --apart from measure out the ingredients-- is dump the fixings into the gadget and walk away until it dings its "the bread has loafed" ding. Then all you need to do is cool it, wipe down the inside of the machine and wash the tin. It's a little too sterile for my liking...and truth be told, I usually wind up losing one of the kneading paddles into the crumb, so I end up massacring its underside, pulling out huge wodges of bread in search of a wandering machine part.

I wasn't forced to use the bread machine, something an uncle convinced my parents to get, but being the lazy sort I am, it became very convenient...and a very lah-di-dah excuse to not be lassoed into doing something as exciting as digging my eyes out with the catbox scoop--"Oh no, thanks for the invite, but I really do need to make some bread...yes, I do bake my own...it's terribly complicated...I really can't leave it, even through the second rise...yes, there's more than one rise...it's that sort of thing." Given the bread machine was usually hid under a tea towel, many people never noticed it.

To tell you the truth, there was a bit of me that was happy when the bread machine broke some 10-odd years ago. I'd rather have my hands stuck in a mass of sticky, yeasty and, well, farty dough than letting some dispassionate contraption have all the fun.

Let's face it, breadmaking by hand is not for the feint of heart, nor wimpy of arm. Although not required, a...healthy, if not plumptious physique helps with all that kneading and rolling and slapping and smacking that goes on when taming yeast bubbles. It also helps if you have a wee bit...or a whole bushel-load...of frustrations to work through. Think of the dough as a soon-to-be edible stressball.

If you've ever wanted to make French Bread, this recipe is one to try. Whatever you do, don't be discouraged by its copious notations, nor the total amount of time needed to make this bread from start to finish: Sarah's and Mary's hints, suggestions and clarifications are a fabulous way to calm even the most nervous of novice breadmakers, and well, you really aren't that active for all that breadmaking time (up to nine hours, if you want to know)...most of it is spent letting the dough grow, so you can go about your normal housey antics...cleaning, flitting through blogs, chasing the cat, watching Coronation Street, all of the above...

I was so pleased with my humble little loaf. I knocked on the crust--it had that lovely deep sound a good crusty loaf should have. The outside was a beautifully burnished colour and he crumb was soft and yielding. Fresh, it's delicious with butter and jam. Cut into thick batons and lightly toasted, it's fabulous dunked into (
Nigella's) Oeufs en Cocotte.


To read what the other DBs did with this challenge, take a meander through our blogroll.


cheers!
jasmine


AddThis Social Bookmark Button

06 February 2008

Breakfast for supper

It doesn't take much for me to pounce on breakfast. I'm more than happy to scramble an egg or two, fry some mushrooms or whip up some pancakes. And as anyone who meets me in Toronto, or comes out here knows, my first restaurant suggestion is usually one of a handful of favourite breakfast or brunch specialists.
So when Dear Friend agreed to come over yesterday to alleviate me of my wireless woes (hence the reason I'm posting this today, and not yesterday), I knew what we'd have for supper.

I know, I know, most people go for Pancakes on Pancake Tuesday, but not me, not this time. Don't get me wrong--I'm a happy flapjack-flippin' fiend--but this time, waffles beckoned. Not just any waffle, but gingerbread waffles.

I grew up only knowing toaster waffles--frozen, cardboard-like discs studded with the remnants of freezerburned, deccicated blueberries. Sure they were a bit thin and tasted of petroleum byproducts, but that woven pattern--with all those valleys just waiting to cup a few drops of maple syrup or honey or some freshly melted butter were just bliss to the seven-year old I was.

Later I discovered what I thought of as restaurant-styled waffles: light, crispy...and unlike toaster waffles, their sheer size meant that one usually sufficed. If I was blissful with my grocer's freezer's offerings, I was in sheer ecstasy over real waffles.

I don't know what possessed my parents to buy a waffle iron, when I was in university. I can only guess at a happy combination of my father's love affair with all things gadgetty, and my mother's obsession with many things kitchenny. I'm only happy my father didn't try and build one, sight unseen.

So, there we were with a waffle iron...and no recipes--the instrument must have come with some, but for whatever reason, we didn't try them. My mum tried using pancake batter, and then variants of that batter (including one that used chopped bacon) but they didn't work out well...we were stumped. I'd told them of the waffles I'd had at restaurants and they wanted to try their hands at making some.

Back then--before the time of blogs, before the Web was more than a single silken thread, and when Usenet was the place to be (well...for some of us), I posted a request for waffle recipes; a wonderful person named Linda helped me out.

Her Gingerbread Waffles are to me, the perfect waffle--not too sweet and lightly spiced, and they fill the kitchen with a wonderful, almost Christmassy aroma. They are quite popular with everyone who's tried them--no one says no to these. Heck, I even had a marriage proposal because of them (of course I said "no"...he was only interested in my baked goods).

I prefer them pooled in sticky, smoky maple syrup with little rivulets of melted butter, but they are equally good with dollops of whipped cream or warmed caramelised apple slices.


Linda's Gingerbread Waffles

260g plain flour
1 dspn (2tsp) baking powder
1/2tsp salt
1Tbsp sugar
1tsp ground ginger
1tsp ground cinnamon
1/2tsp ground cloves
3 egg yolks
125ml melted butter
375ml whole milk
3 egg whites

Whisk together the dry ingredients and set aside. Mix together the yolks, butter and milk. Add the milky yolk mixture to the dry ingredients and mix until combined. Set aside while you beat the egg whites to stiff peaks. Fold the whites into the batter and let stand for at least 30 minutes. Truth be told, I usually make the batter the night before and let it sit in the fridge, tightly wrapped.


cheers!
jasmine