30 June 2008

While you're waiting for the round up

WHEW! That's a lot of posting...kinda takes it outta a gal...

So...while you wait for me to upload the round-up, here's an easy-peasey one-stop for the run up to Mmm...Canada: The Savoury Edition.

22 June 08:
Honibe Honey Drops (Product Review)
23 June 08:
Spiced Blueberry-Maple Syrup (Mmm...Canada: SHF submission)
24 June 08:
Ontario Lamb (Lamb Curry)
25 June 08:
Yukon Gold Potatoes (Potatoes, Cabbage and Cauliflower thing)
26 June 08: Oats (Fruit and Nut Granola)
27 June 08: Cheese (a small sampling)
28 June 08: Bacon, Ramp and Mushroom Swirls (Mmm...Canada: The Savoury Edition submission)

And yes. The astute amongst you realised that I tried to do a post for each of the food groups on Canada's food guide...Meat & Meat Products (lamb); Fruit & Veg (Potatoes...if not then the cabbage and cauliflower count); Grains (oats); Dairy (cheese) and other (honey).

Please note: I've replied to every entrant with a savoury post. If you haven't a note from me, please resend your info to me.

See you tomorrow with the event round-up.


cheers!
jasmine


AddThis Social Bookmark Button

29 June 2008

Daring Bakers: Danish Braid

This month's challenge was a project I'd hope we'd do--a flaky and buttery type pastry. Not a flaky pie pastry (I can do that already), but one that's in line with croissants or puff pastry. Kellypea of Sass and Veracity and Ben of What's Cooking? challenged us to make a Danish braid. Fabulous! Woo hoo! Yippee!

But...ummm...all the Danish braids I've ever had were
shop-bought things that were either bready or flaky. So how am I to figure out how my attempt fared against what it was supposed to be? But then again...does it really matter?

What I mean is...many recipes I try are ones that read well. The final product has an interesting title, has ingredients I have on hand (or ones I can easily get), is something I've heard of in legend (or on a blog somewhere). Stylized, retouched, pixelated purveyances generally don't lure me (I say *generally* I have my moments of weakness). Basically, if the end result is something I like, then I think it's successful. Full stop.


So when I tackled the recipe, the only clues I had to how it might turn out were the yeast (bready?) and Ben's comment about making puff pastry by hand (flaky?).

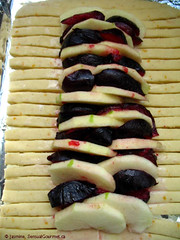
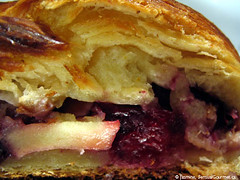
The filling I chose was a combination of pluot and granny smith apples. I'd not had pluots at all before, but they were ripe and available. Prepped them quite simply--sliced the pluots in wedges and interspersed them between slices of peeled apple, and then topped the fruit with brown sugar.

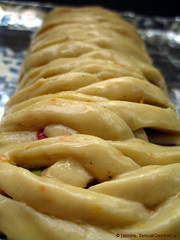
My only tip is to tightly plait the strands--don't do a haphazard brand, otherwise the strips will dislodge and leave you with something that looks more akin to a ribcage after the rise...fine if you were making a cadaver for a Hallowe'en party, but not really for this.


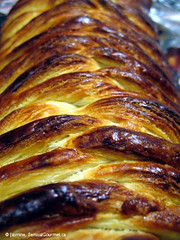
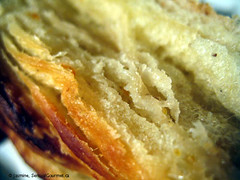
Oh, and how did it taste? Buttery, not too sweet, a bit spicy. Oh yes...and the texture? The bottom was a bit bready and the plaits were a bit flaky...

Normally I don't post the DB recipes and just send you to the host's site, but this time I am for two reasons--one: I wanted to provide the recipe for a single braid or at least six smaller pastries and two: the cardamom comes through really nicely...and I've been a bit remiss in cooking with cardamom over the past...well...while.

Danish Braid
adapted from Sherry Yard’s The Secrets of Baking; makes one braid

Danish dough
Ingredients
½ Tbsp dry yeast
60ml full-fat milk
30g sugar
finely grated zest of half an orange
¼ tsp ground cardamom seeds (a mounded ¼ tsp)
1tsp vanilla extract
1 well chilled egg
2 Tbsp orange juice
a healthy pinch of salt
250g plain flour (divided into 230g and 20g)
125g sweet butter


Putting it together
  1. Whisk together the yeast and bowl. Then add the sugar, zest, cardamom, vanilla, egg, and orange juice and mix well.
  2. Sift together the 230g flour and salt in a separate bowl. Pour in the liquid and deftly mix together. When incorporated, turn out onto a lightly floured surface and kneed until smooth and easy to work with, adding more flour if the dough is sticky.
  3. Wrap in cling and chill for half an hour.
  4. In a separate bowl, beat together the rest of the measured flour with the butter until smooth and lump-free. Set aside at room temperature.
  5. After the dough (the detrempe) has chilled, turn it out onto a lightly floured surface. Roll the to 45cm x 32cm (18"x13") rectangle approximately 1cm (¼") thick. The dough may be sticky, so keep dusting it lightly with flour.
  6. Spread all the butter (the beurrage) evenly over the center and right thirds of the dough. Fold the left edge of the detrempe to the right, covering half of the butter. Fold the right third of the rectangle over the center third. This is the first single turn. Mark the dough by poking it once with your finger to keep track of your turns. Place the dough on a baking sheet, wrap in cling, and pop into the fridge for half an hour.
  7. For the second single turn, place the dough lengthwise on a floured work surface, with the open ends at your right and left. Again, roll out the dough into a 45cm x 32cm (18"x13") rectangle approximately 1cm (¼") thick. And again, fold the left third of the rectangle over the center third and the right third over the center third. Poke it twice and wrap in cling and refrigerate the dough for half an hour. Repeat twice more for a total of four single turns, adding a poke each time.
  8. After the fourth go round, refrigerate at least five hours or overnight. The Danish dough is now ready to be used. If you will not be using the dough within 24 hours, freeze it by rolling the dough out to about 2.5cm (1") thick, wrap tightly in cling, and freeze; defrost in the refrigerator for easiest handling. Danish dough will keep in the freezer for up to 1 month.


For the Danish braid.
Ingredients
1 recipe Danish Dough (as above)
1 cup filling of choice
1 beaten egg

Putting it together

  1. Line a baking sheet.
  2. On a lightly floured surface, roll the Danish Dough into a 20cm x 25cm (8"x10"), 1cm (¼") thick. If the dough seems elastic and shrinks back when rolled, let it rest for a few minutes, then roll again. Place the dough on the baking sheet.
  3. Along one long side of the pastry make parallel, 5cm (2") long cuts at roughly 1cm (¼") to 2cm (¾") intervals with a knife or rolling pastry wheel. Repeat on the opposite side, taking care to ensure you line up the cuts with those you’ve already made.
  4. Spoon the filling down the center of the rectangle. Starting with the top and bottom “flaps”, fold the top flap down over the filling to cover. Next, fold the bottom “flap” up to cover filling. This helps keep the braid neat and helps to hold in the filling.
  5. Fold the cut side strips of dough over the filling, alternating first left, then right, left, right, until finished, as if you are braiding hair. Trim any excess dough and tuck in the ends.
  6. Brush, lightly with the beaten egg to coat the braid.
  7. Cover with a greased sheet of clink and proof until doubled in size and light to the touch. Near the end of proofing, preheat oven to 200C (400F) and position a rack in the center of the oven
  8. Bake for 10 minutes.Lower the oven temperature to 180C (350F), and bake about 15-20 minutes more, or until golden brown.
  9. When done, remove to cool on a wire rack.
  10. Serve still warm from the oven or at room temperature.
  11. The cooled braid can be wrapped airtight and stored in the refrigerator for up to two days, or freeze for month.

To read what the other DBs did with this challenge, take a meander through our blogroll.


cheers!
jasmine

Edit: For those of you wondering about pluots, I've written a short post abou them here:


AddThis Social Bookmark Button


28 June 2008

Mmm...Canada: Bacon, ramp and mushroom swirls

Earlier this month Jennifer and I issued a challenge to the foodblogging (and foodblog reading) world. We want to know what Canada tastes like to you. She's interested in all things sweet and I'm interested in the savoury side of life

In my entry for Jennifer's event, I stated that I think Canadian cuisine (savoury or sweet) developed through adapting family and cultural dishes using a mixture of indigenous and introduced foods. For that post, I made spiced blueberry-maple syrup that combined indigenous ingredients (maple syrup and wild blueberries) along with introduced flavours (cinnamon and black pepper).

For my own event, I'm keeping within that theme and expanding it a teeny bit.

In May a good friend of mine left a
box of wild bounty she collected from her properties for me. My, those were some lovely looking ramps.

My idea was quite simple: work with flavours that play well together to bring out their oniony-garlicky best. Essentially what I think of as the basic tenet of cooking (Canadian or otherwise)-- simple homey cooking that's unfettered by fashion that uses what's easily available in a tasty way that's not only soothing but also makes you glad you're home.

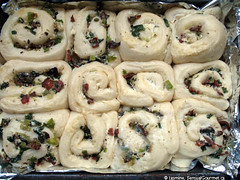
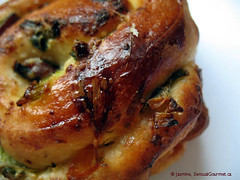
In researching the various rampy treats, I came across a a recipe for a savoury ramp strudel. With a few tweaks (aided by a bit of a stromboli fascination), I decided to make savoury, swirly buns, using bacon, cheese and mushrooms. It sounds like a lot of elements, but really, it isn't. Plus, it combines those ingredients in a way I think of as Canadian in substance and spirit:

  • Pigs were brought over fairly early in our history,
  • Quebec has a great cheesemaking tradition, and we do make our own versions of American and European cheese
  • Mushrooms are both harvested wild and cultivated
  • Prairie wheat was used to mill my flour
  • Herbs and spices from Europe and Asia

Again, this is a recipe that really doesn't need one. Okay...the bun part does. If you don't have a recipe you like, I made mine based on Edna Staebler's Neil's Harbour White Bread (and I used one-third the recipe).

The filling:

  • streaky bacon, chopped into bits
  • ramps (spring onions, green onions, globe onions or leeks will also do), green and white bits, chopped
  • chopped mushrooms
  • salt, pepper, thyme
  • softened cream cheese (any soft or melty cheese will do)
  • one beaten egg
  • Parmesan cheese

Make the dough. During the first rise, fry the bacon until crisp and evacuate the bits to a bowl, leaving the fat in the pan. Fry the ramps and the mushrooms in the fat--add some oil if you need to. Season with salt, pepper and thyme. Reintroduce the bacon to pan and give it all a good stir. Remove contents to a bowl and set aside.

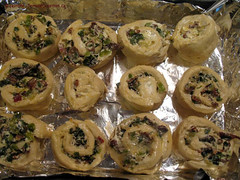
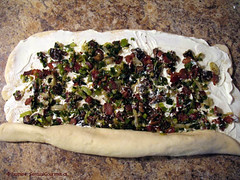
After the dough has doubled, role it out to a 24x30 cm (8"x12") rectangle. Smear with cream cheese and spread the rampy-baconny-mushroomy topping over the cheese. Roll the sheet up, so you have a 30-ish cm log. Slice in 12 rolls and place in a baking tin. Brush with beaten egg and sprinkle with Parmesan cheese. Let rise until doubled in size.

Heat oven to 200C/400F and bake for 10-15 minutes or until done.


Check back on Canada Day (01 July 2008) to see Mmm...Canada: The Savoury Edition's round-up)


cheers!
jasmine



AddThis Social Bookmark Button