25 January 2010

On My Rickety Shelves: Fat

Thanks to the lovely people at Random House, a copy of this month's cookbook selection was delivered to my kitchen.

Fat: An appreciation of a misunderstood ingredient with recipes
By Jennifer McLagan
McLelland & Stewart/Random House Canada
240 pages; $37.95

Fat is vilified. Whether it’s a woman’s natural curves or a recipe’s call for lard, this basic stuff which of which we’re made and need is the same stuff entertainment and corporate-sponsored “food experts” tell us to ostracise and eliminate.

Ironic, this, given in stressful times when we need comfort, we are drawn towards fat (as well as it’s taboo’d compatriots, sugar and fat)—whether it’s a bowl of rich ice cream covered in hot caramel sauce or a bolstering embrace by soft arms.

Jennifer McLagan’s Fat: An appreciation of a misunderstood ingredient with recipes
takes on populist thinking of the past 30-40 years, and tells us that fat, unadulterated by undue processing, needs to regain its rightful place in our diets.

She reminds us that up until the last century, fat was good: we wanted a “fat paycheque” so we could buy the plumpest chicken and those who didn’t get enough fat in their diets were often ill (something I still maintain), as well as what the food industry has done to degrade our collective health such as introducing quantities of trans-fat laidened hydrogenated fats and easily oxidised polyunsaturated oils.

McLagan’s well-written and thoughtful work focuses on four animal fats, some in regular, purposeful home kitchen use, but others not so: butter, pork fat, poultry fat and beef and lamb fat. While photographs do not accompany each recipe, the images provided are vibrant and lovely. The book is also dotted with mini-essays about the importance of fat in history, whether it is pemmican, Haseka “The Butter Saint” or the origins of Fat Tuesday.

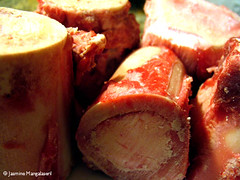
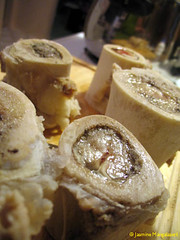
What I find most helpful are the instructions for once-common bits of kitchen business such as rendering fats or removing marrow from beef bones, the latter I needed to make her Risotto Milanese. Her no-nonsense words guided me through the process well enough to produce an amazing dish.

As with my other reviews, the proof of a book’s value is in the recipes. Here are the ones I attempted:

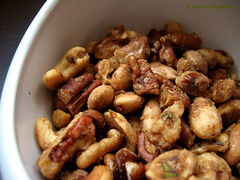
Mixed Spiced Nuts (p36)
I’m not a fan of processed spiced nuts—manufacturers tend to mistake salt and sugar for flavour. Combining the resinous hints of rosemary, cumin’s and coriander’s smokiness, salt sugar and a bit of heat, these buttered nuts were easy and almost disparagingly deliciously addictive.


Pumpkin and Bacon Soup (p83)
I liked this soup, but I didn’t love it. It was nearly effortless, but even though smoky bacon and its rendered fat were used, it lacked depth of flavour. I will make this again, but instead of using plain water, I’ll use vegetable or chicken stock or perhaps apple juice.


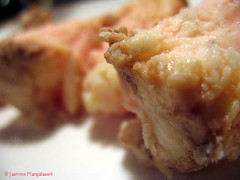
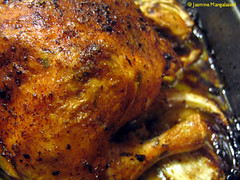
Simple Roast Chicken (p138)
Often simple is best. McLaglan’s recommendations very closely mimicked my own standard roast chicken recipe, and it produced a bird with juicy meat and crispy, golden skin. My only qualm is I felt 100g of butter was too much, and I’d easily halve the amount.


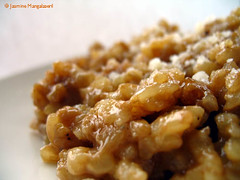
Risotto Milanese (p195)
I’ve rarely found a risotto recipe that matches the dish I had in Milan six years ago. McLagan’s recipe uses beef marrow, along with butter to make this perhaps the most luxurious risotto I’ve ever had.


So how does it rate?
Overall: 3.6/5
The breakdown:
Recipe Selection: 4/5
Writing: 3.5/5
Ease of use: 3.5/5
Yum factor: 3.5/5
Table-top test: Lies flat

Kitchen comfort-level: Intermediate
Pro: A good range of recipes ranging drawn from a number of cuisines.
Con: This isn’t a book for those who need or want to be coddled in the kitchen.


cheers!
jasmine


I'm a quill for hire!


AddThis Social Bookmark Button

20 January 2010

I is a grown up: removing marrow from beef bones


I first felt adult when I set up my first Registered Retirement Savings Plan. I guess that says a lot about me. It wasn’t when I passed my driver’s test. It wasn’t when I cast my first vote. It wasn’t when I could legally drink.

In my mid-20s and in my first real job I knew I didn’t want to be one of those grannies who subsist on tea and toast, with only the government pension scheme keeping me off the streets. Setting up an RRSP seemed like right thing to do to better fund a retirement which was decades away. Retirement is still decades away and despite my best efforts, other moments keep my maturity needle keeps edging towards adulthood.

Grown-up moments in my kitchen have been known to happen.
In as practical a matter as cooking is, I simply love to clatter pots and pans and will roll up my sleeves and do what’s necessary. No fanfare. No melodramatic noises. I know not everyone is comfortable with dismembering a bird or resurrect the Spanish Inquisition when heating up a vat of oil for deep fat frying, but these bits of business are regular occurrences in my kitchen.

That’s not to say I don’t celebrate scaling my own Everests. Whether it was my first caramel that didn’t turn into a crystallised charred glob or creating a pastry that doesn’t make one wax lyrically about boot leather, these accomplishments are quietly celebrated and reinforced whatever culinary acumen possess.
Earth-shattering? No. Nobel or James Beard Prize-winning? Not in the slightest. Moments that forward my kitchen’s progress? Yes.

My most recent maturing moment came when I had to extract marrow from beef bones.

The oleophobic and hemophobic, squeamish about biological bits of kitchen work may simply want to turn away now.

I’ve often seen marrow bones in the bigscarymegamart’s butcher’s case. Honestly, apart from a slurp of broth, or sopping up drippings from a roast, I’ve not really considered them for much. A chosen recipe from the next cookery review demanded I use beef marrow…and for that I needed to, well, extract beef marrow from beef bones

To remove marrow from beef bones, a bit of exsanguination must take place. Scooping it from an unsoaked bone will result in globules of cooked blood in your finished dish. You may or may not care, but for my usage, I had no inclination to dig into a dish, splattered with greyed brown.


Down to business
To remove the blood from the bones, cover the bones in saline ice water solution (two tablespoons of salt mixed into the water) and refrigerate for 12-24 hours. 
Completely change the water every three or four hours, replacing the pinkish solution with increasingly salty water, adding more two tablespoons of salt to each saline solution (the first change will have four tablespoons of salt, the third, six tablespoons, etc).
At the end of the process, remove the soaked bones to a pan of simmering, salted water. Simmer them, uncovered for about 5-10 minutes, or until the marrow just loosens from the bone. 
Removed to a paper towel-lined plate and let sit until cool enough to handle.
With the aid of a paring knife, loosen the marrow from the bones and push the fatty pieces into a bowl of icy water. 

You can refrigerate the marrow until you need to use it.

And that’s all that was needed for this rite of passage.

cheers!
jasmine
I'm a quill for hire!


AddThis Social Bookmark Button

15 January 2010

Happy birthday Edna: Cranberry-ginger swirly buns

A few years ago I, along with a number of bloggers, celebrated the life of my dear friend Edna Staebler with an event called A Day That Really Shmecks.

I wanted to continue celebrating her life, on her birthday, but life happened and continues to do so. This year I may have not resurrected the event, but I am event this year but I'm celebrating Edna today. Maybe next year I'll get my act together and ask people to join me.


One of my ways of showing others I care is to cook for them. Rarely intricate, occasionally zhuzhed, I will occasionally appear, dish in hand with something I hope is as equally heart warming as it is tummy warming.

A kitchen filled with the comfortingly warm scent of freshly made bread will make the world a better place. It's a life axiom. So when a friend was hit with a bit of shocking news earlier this week...the kind where the fug of words just suck away oxygen and thought, I wanted to do something to let her know that that she's thought of and I care. Swirly buns must be made
Edna's Neil's Harbour Bread recipe has become my jump point when making anything of this ilk. The recipe has never failed me and I find almost infinitely forgiveable. In fact the only time it begrudgingly gave me a loaf was when I accidently slashed the top of the loaf prior to baking: the texture remained gorgous, but instead of a wonderful domed crust, a flattened lid formed.
This variation used a warmed, thinned yoghurt instead of water and an improvised filling. I'm not convinced you actually need a recipe for the swirl of any swirled bun (cinnamon buns, included)--just brush with melted butter and sprinkle with as much spiced sugar as you want and then sprinkle handfuls of fruit and or nuts. And yes, you can forgo the sugar and spread chocolate, caramel or go a savoury route and use a cream cheese doctored with herbs, onions or veggies.

Cranberry-ginger swirly buns

85ml hand-hot water
1/2tsp sugar
1dspn traditional yeast
60ml yoghurt dissolved with 100ml hot (but not boiling) water
35g sugar
1tsp salt
40ml canola or some other flavourless oil
420g ap flour (plus more, if necessary)
Melted butter
3Tbsp brown sugar
2Tbsp sugar
pinch of salt
1/2-1tsp powdered ginger
a couple of handfuls of dried cranberries

Dissolve the yeast and half teaspoon of sugar in the hand-hot water. Let sit for about 10 or 15 minutes until a frothy head has formed.

Whisk in the yoghurty mixture, 35g sugar, salt and oil.

Work in the flour, about a cup at a time, mixing until you have a floppily moist, but easily handled dough. Turn out onto a well-floured surface and knead, sprinkling in as much flour as the dough needs--until smooth and elastic but still slightly sticky.

Plop the dough into a well-oiled bowl and cover with a damp teatowel, well-oiled piece of cling or waxed paper. Set to double in volume in a warm place free of drafts or other disturbances--somewhere in the 1-2 hour range.

Butter an appropriately-sized baking dish (24cm (8") square if you want nine buns; 23cm x 33cm (9" x 13") if you want a dozen).

Mix the remaining sugars, salt and ginger together.

When the dough has grown to the appropriate size, give it the poke test. By this I mean deeply poke the dough with your index and middle fingers. If the indentations stay, the dough is ready to be worked. If they fill in quickly, then the dough needs rise a bit longer.

When the dough passes, knead it again and then roll it out into a rectangle-I really don't measure, but roughly 30cm x 45cm (12" x 18"). Brush with melted butter and sprinkle with gingery-sugar mixture. Strew the cranberries, on top.

Roll it up, so you have a 45cm-long roll. Cut into the appropriate number of pieces and set into the greased pan, spaced apart to give them enough time to grow.

Return to that warm place, free of drafts and other disturbances, for about an hour, to let the buns grow.

Preheat the oven to 200C/400F. Brush the tops with melted butter and bake for 20 minutes or until golden.

When cooled, cut the individual buns. Glaze as, how and if you wish.

cheers!
jasmine

What I'm reading:
The Girl With The Dragon Tattoo by Stieg Larsson (opens to my Amazon.ca shop)

I'm a quill for hire!


AddThis Social Bookmark Button


10 January 2010

Chocolate Mint Pots de Creme

When self-induced self-improvement’s constant hum turns into January’s roar of nicotine patches, head-hunter appointments and gym memberships, it’s time to take matters into my own hands.

New Year resolutions aren’t my thing. It’s not that I can’t do with a bit of self-improvement—Heaven knows that unfurled laundry list is longer than I am tall--it’s just that replacing a calendar doesn’t urge me into making life changes (large or small).

I support my friends when it makes sense, but when water bottle nutrient charts and power walking calculations to “burn off” a slice of unbuttered toast seep into life’s white noise, I get more than a little bored.

Maybe it’s because deep down, I expect this 3 January marriage to devolve to a mostly committed relationship by 15 February, casual brief encounters by 27 March and total strangers by 19 April.

Perhaps I’m simply tired of people linking happiness to denying some of life’s sweet, sticky and luscious pleasures. If anything that withholding simply strengthens cravings to the point that when the wannabe self improved weaken, they do so in a deeply sweet, dangerously sticky and oozingly luscious bliss.

If the actual goal is to take on a sensible diet, I think the best way is to learn how to include loved foods on a frequently infrequent basis and avoid abstinence. In my books, a sensible diet includes reasonable amounts of chocolate and cream and eggs. Which means a sensible diet includes reasonable amounts of chocolate pots or pots de crème au chocolat.

I developed this recipe for a close friend who stayed following some minor surgery. Limited to soft foods, I thought this pud would be easy enough for her to eat, chocolaty and minty enough to raise her spirits, and easy enough to prepare on a busy morning and leave in the fridge for the rest of the day.

As with any custard, preparing to mitigate the eggs’ curdling way is wise. To do so, fill your sink basin with several inches of cold water – icy cold, if you can manage it. If while heating the custard you feel it considering splitting, curdling or simply turning to scrambled eggs, immediately take the pot off the hob and plunge it into the cold water, while stirring vigorously.

I’m not going to kid you. This is a rich dessert and measured portions are the better way to go: this recipe produces about 800mls of custard, which will give you six generous portions or eightish reasonable portions. Mind you…if you are recovering from surgery, having a bad day or need to face the new year with the steely resolve of Boxing Day shoppers at an electronics shop this may just barely be enough for one serving.


Pot de Crème au Chocolat à la Menthe (Chocolate Mint Pots)
Serves 6-8, more or less

45g cocoa powder
20g butter
140g bittersweet chocolate (85 per cent cocoa, if possible), chopped
6 egg yolks
135g sugar (less if using a lesser cocoa percentage chocolate)
pinch of salt
a good splash of vanilla extract
300ml full fat milk
200ml heavy cream
a sprig of fresh mint (or a half tsp of mint extract)

Scald the milk and cream with the mint leaves. Take off the heat and let sit for about 20 minutes.

While the cream is cooling, slowly melt together the butter, cocoa and bittersweet chocolate until glossy but not oily. Set aside.

Whisk together the yolks, sugar, vanilla and salt. Slowly temper the egg mixture with the warmed chocolate, keeping care to not scramble the eggs. Then, equally slowly pour the cooled cream, complete with the mint) into the chocolate mixture, stirring well all the time.

Return to the hob and heat thoroughly—the intensity of heat decreasing as your timorousness increases. Continue stirring for several minutes until the custard thickens. If the eggs begin to get claggy, immediate take the pot off the heat and plunge it into a sink of cold water, as discussed above.

Sieve out the leaves (and any bits of egg that has scrambled) and decant into teacups, demitasses, small ramekins or small glasses. Let cool on the countertop and then cover with cling film and pop into the fridge for at least four hours—it will thicken as it cools.

To serve, dollop with a little whipped cream or fruit, or just serve as-is.
cheers!
jasmine

What I'm reading:
The Girl With The Dragon Tattoo by Stieg Larsson (opens to my Amazon.ca shop)

I'm a quill for hire!


AddThis Social Bookmark Button