 This month's challenge was a project I'd hope we'd do--a flaky and buttery type pastry. Not a flaky pie pastry (I can do that already), but one that's in line with croissants or puff pastry. Kellypea of Sass and Veracity and Ben of What's Cooking? challenged us to make a Danish braid. Fabulous! Woo hoo! Yippee!
But...ummm...all the Danish braids I've ever had were shop-bought things that were either bready or flaky. So how am I to figure out how my attempt fared against what it was supposed to be? But then again...does it really matter?
What I mean is...many recipes I try are ones that read well. The final product has an interesting title, has ingredients I have on hand (or ones I can easily get), is something I've heard of in legend (or on a blog somewhere). Stylized, retouched, pixelated purveyances generally don't lure me (I say *generally* I have my moments of weakness). Basically, if the end result is something I like, then I think it's successful. Full stop.
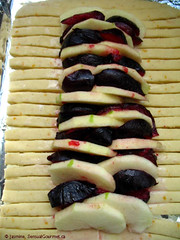

So when I tackled the recipe, the only clues I had to how it might turn out were the yeast (bready?) and Ben's comment about making puff pastry by hand (flaky?).
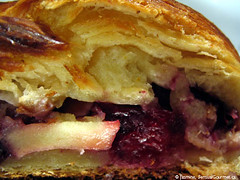
The filling I chose was a combination of pluot and granny smith apples. I'd not had pluots at all before, but they were ripe and available. Prepped them quite simply--sliced the pluots in wedges and interspersed them between slices of peeled apple, and then topped the fruit with brown sugar.
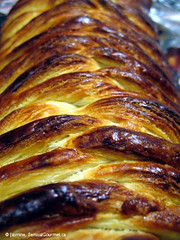
My only tip is to tightly plait the strands--don't do a haphazard brand, otherwise the strips will dislodge and leave you with something that looks more akin to a ribcage after the rise...fine if you were making a cadaver for a Hallowe'en party, but not really for this.

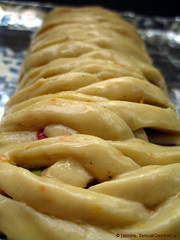
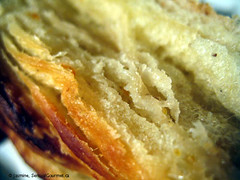
Oh, and how did it taste? Buttery, not too sweet, a bit spicy. Oh yes...and the texture? The bottom was a bit bready and the plaits were a bit flaky...
Normally I don't post the DB recipes and just send you to the host's site, but this time I am for two reasons--one: I wanted to provide the recipe for a single braid or at least six smaller pastries and two: the cardamom comes through really nicely...and I've been a bit remiss in cooking with cardamom over the past...well...while.
Danish Braid
adapted from Sherry Yard’s The Secrets of Baking; makes one braid
Danish dough
Ingredients
½ Tbsp dry yeast
60ml full-fat milk
30g sugar
finely grated zest of half an orange
¼ tsp ground cardamom seeds (a mounded ¼ tsp)
1tsp vanilla extract
1 well chilled egg
2 Tbsp orange juice
a healthy pinch of salt
250g plain flour (divided into 230g and 20g)
125g sweet butter
Putting it together
- Whisk together the yeast and bowl. Then add the sugar, zest, cardamom, vanilla, egg, and orange juice and mix well.
- Sift together the 230g flour and salt in a separate bowl. Pour in the liquid and deftly mix together. When incorporated, turn out onto a lightly floured surface and kneed until smooth and easy to work with, adding more flour if the dough is sticky.
- Wrap in cling and chill for half an hour.
- In a separate bowl, beat together the rest of the measured flour with the butter until smooth and lump-free. Set aside at room temperature.
- After the dough (the detrempe) has chilled, turn it out onto a lightly floured surface. Roll the to 45cm x 32cm (18"x13") rectangle approximately 1cm (¼") thick. The dough may be sticky, so keep dusting it lightly with flour.
- Spread all the butter (the beurrage) evenly over the center and right thirds of the dough. Fold the left edge of the detrempe to the right, covering half of the butter. Fold the right third of the rectangle over the center third. This is the first single turn. Mark the dough by poking it once with your finger to keep track of your turns. Place the dough on a baking sheet, wrap in cling, and pop into the fridge for half an hour.
- For the second single turn, place the dough lengthwise on a floured work surface, with the open ends at your right and left. Again, roll out the dough into a 45cm x 32cm (18"x13") rectangle approximately 1cm (¼") thick. And again, fold the left third of the rectangle over the center third and the right third over the center third. Poke it twice and wrap in cling and refrigerate the dough for half an hour. Repeat twice more for a total of four single turns, adding a poke each time.
- After the fourth go round, refrigerate at least five hours or overnight. The Danish dough is now ready to be used. If you will not be using the dough within 24 hours, freeze it by rolling the dough out to about 2.5cm (1") thick, wrap tightly in cling, and freeze; defrost in the refrigerator for easiest handling. Danish dough will keep in the freezer for up to 1 month.
Ingredients
1 recipe Danish Dough
1 cup filling of choice
1 beaten egg
Putting it together
- Line a baking sheet.
- On a lightly floured surface, roll the Danish Dough into a 20cm x 25cm (8"x10"), 1cm (¼") thick. If the dough seems elastic and shrinks back when rolled, let it rest for a few minutes, then roll again. Place the dough on the baking sheet.
- Along one long side of the pastry make parallel, 5cm (2") long cuts at roughly 1cm (¼") to 2cm (¾") intervals with a knife or rolling pastry wheel. Repeat on the opposite side, taking care to ensure you line up the cuts with those you’ve already made.
- Spoon the filling down the center of the rectangle. Starting with the top and bottom “flaps”, fold the top flap down over the filling to cover. Next, fold the bottom “flap” up to cover filling. This helps keep the braid neat and helps to hold in the filling.
- Fold the cut side strips of dough over the filling, alternating first left, then right, left, right, until finished, as if you are braiding hair. Trim any excess dough and tuck in the ends.
- Brush, lightly with the beaten egg to coat the braid.
- Cover with a greased sheet of clink and proof until doubled in size and light to the touch. Near the end of proofing, preheat oven to 200C (400F) and position a rack in the center of the oven
- Bake for 10 minutes.Lower the oven temperature to 180C (350F), and bake about 15-20 minutes more, or until golden brown.
- When done, remove to cool on a wire rack.
- Serve still warm from the oven or at room temperature.
- The cooled braid can be wrapped airtight and stored in the refrigerator for up to two days, or freeze for month.
To read what the other DBs did with this challenge, take a meander through our blogroll.
cheers!
jasmine
Edit: For those of you wondering about pluots, I've written a short post abou them here:


37 comments:
ooooo, jasmine! gorgeous braids! i would kill for a slice!
Looking good. And the use of pluots is such a good idea.
Looks gorgeous, and I can assure you it looks exactly like it should!
What a great flavour combination! Not something you could just pick up at the local grocery store and the braids are gorgeous to boot :-)
Love the fruit slices inside. I think I would have enjoyed more chunky fruit instead of more of a spread. Great job!
Oooh - I love the look of the filling! Instead of just lumping it in there, yours is all neatly arranged and tall!
Next time....
Yum - that top layer looks lovely and flaky. Mine was a little doughy but still very moreish!gx
Your braid looks fabulous!
Yeah I had that ribcage thing going on. I love your plout and apple combo.
I love cardamom (and mace), too, and should bake with them more often. Lovely braid and luscious filling, my dear!
What a beautiful job you did, Jasmine. Looks perfect. I've never had pluots before but I guess if you can find them in Canada - I must be able to!
Congrats. :)
Great simple but scrumptious filling!
Jasmine I love your filling! I think I'd have been much happier with that than the cooked apple I did even as good as it was. And I really blew it using ground cardamon and not grinding my own fresh seeds.
Beautiful braid!!!!
Man, that looks goooood!
Great job! I like your choice in filling.
Wow those look great...I am new to DB and I love seeing how the regulars do it - yours is fab!
Great job, the filling looks gorgeous!
Fantastic, Jasmin. Glad that cardamom is back ;-)
Did u like the pluot?
Nora
Looks really great. I saw pluots at the local market this morning. Wish I had read this first, I would have picked some up.
In the midst of all your Mmm Canada insanity, you still have time to devote to doing the braid? Do you have one of those kindy suits with an S on the front?
I have no clue what pluot is (sorry, I live in a bubble)
Your braid looks to die for.
Looks yummy. What are pluots? Never heard of them.
I started by making a half batch and then made it 3 times more during the month! A ramp filled one would be good too :)
You know I am rarely at a loss for words but I can only oggle the pictures of your braid...it is gorgeous. Pluot and apple sent me over the edge!!! Bravo!!!!!
Same here, no idea what pluots are.:(
But your braid looks pretty good. I made mine with apple filling too. And good to see you back with the cardamom.
Never heard of pluots either...
Your braid looks wonderful, you can actually even see the flakiness in the upper part. I don't think mine had any flakiness :(
oh my your braid look so yummy!
Pluot and apple... what an intriguing combination. Great job!
Your braid looks beautiful and the filling sounds tasty!!
I thought of you when making this recipe, having never actually used cardamom before. I admit, I didn't like the smell but am not sure about the flavor. Your braid looks great.
Nice filling combo! I see your braid got quite dark as well. I think I'll pull back on the first baking time to 7 minutes next time I make this recipe.
The cardamom was perfect in this dough, don't you agree?
i'm another one who is unfamiliar with pluots so thanks for the introduction. lovely looking braids - not at all cadaverous!
very nicely done! I love all the fruits in it. Great Job!
Mine turned out the same way.. a lil doughy on the bottom, but flakey around the sides and top. Delicious.
I love how you laid the fruit out- what a very pretty braid, sweetie!
As always.. just an amazing job. :)
xoxox
PS - I still owe you an email. :P
Oooh, I love the filling - so fresh and fruity! Your braid looks awesome. Great job!
Looks great! How did the pluots work? I LOVE to eat these...they're more enjoyable than plums to me b/c they're a little tarter and firmer.
oh i love the chunky fruit in this. Jas - perfect braid!
Hello all
Didn't realise the pluots would garner so much attention! I've written a post on them, which I've linked to in the edit.
Post a Comment